Instagram Pro Widget
v1.2.5

2.2.x - 2.3.x
2.2.x - 2.3.x
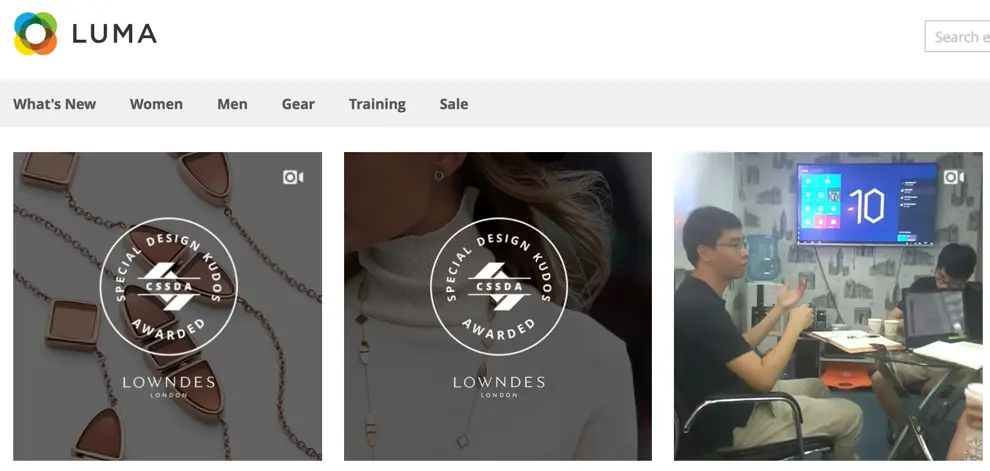
Visual content, like images diversify the appearance of your web store and improve User Experience. Instagram Pro Widget allows you to use the advantages of Visual content to the full extent. Add an Instagram feed right to your website. Show the images you want: from a specific user or sorted by a particular hashtag. Your ideas on making your store better won’t be limited. Decide on where and how you want this widget to be displayed and let your visitors enjoy awesome photos you have chosen for them.
- Turn the extension on and off easily
- Keep posts in cache for as long as you need
- Assign the widget to the Store Views you want
- Choose multiple pages for your widget or just one of them
- Enter the right place for the photos on your online store
- Adjust the appearance of Instagram feed and hide it without deleting
- Set one of the four ways how your photos will be displayed: by User Name, by Hashtag, by Product Hashtag, by Category Hashtag
- Tell your visitors about your photos in Title and Description
- Show post details in a Lightbox, redirect your users to Instagram or don’t show post information at all
- Control the information displayed, like author’s name, avatar, and like count
- Choose the way to display your widget: as a grid or as a slider
- Set the slide autostart and regulate its speed
- Indicate the number of posts displayed

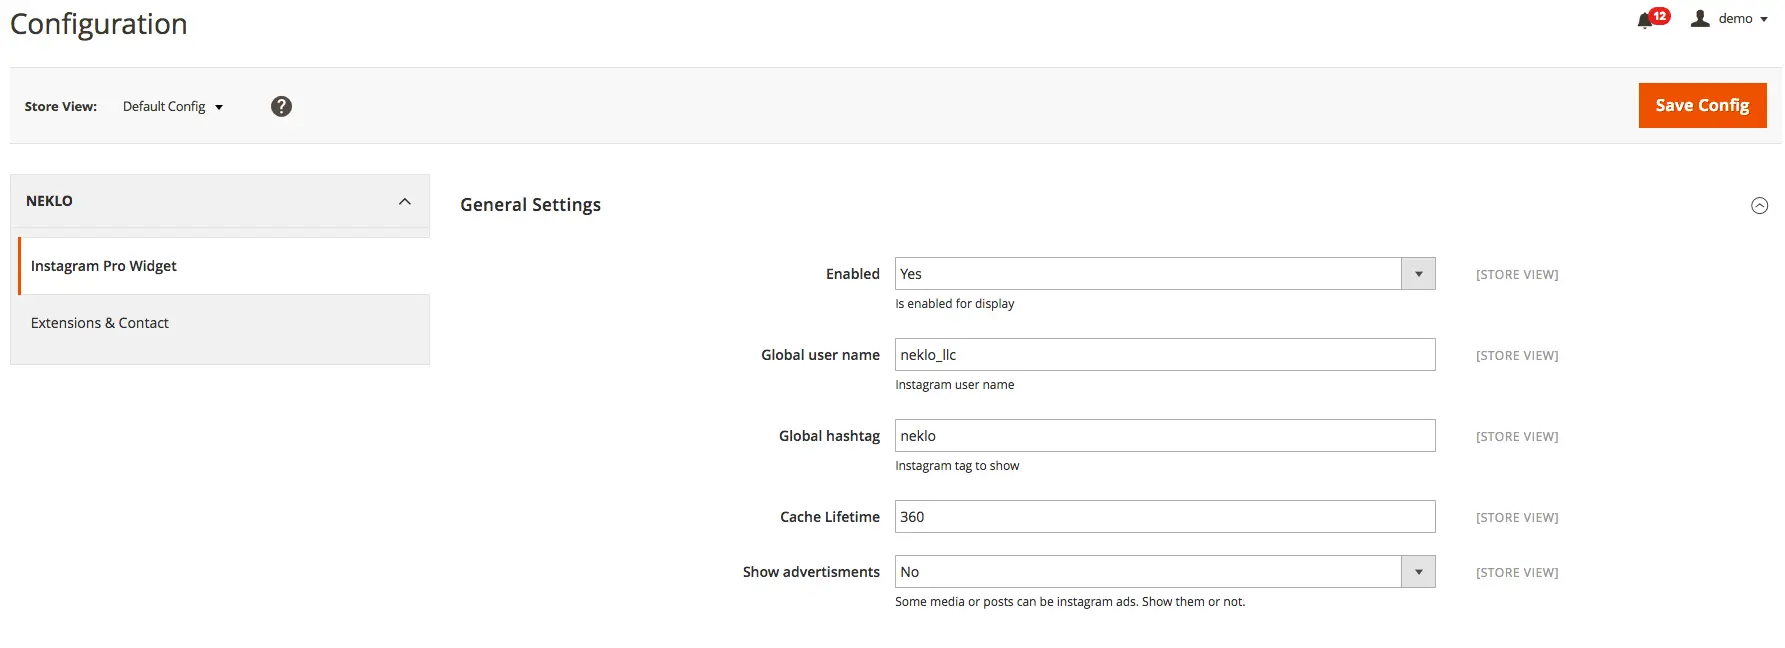
Turn the extension on and indicate Cache Lifetime
To enable the extension and set the desired Cache Lifetime, go to Stores > Settings > Configuration > NEKLO > Instagram Widget > General Settings.

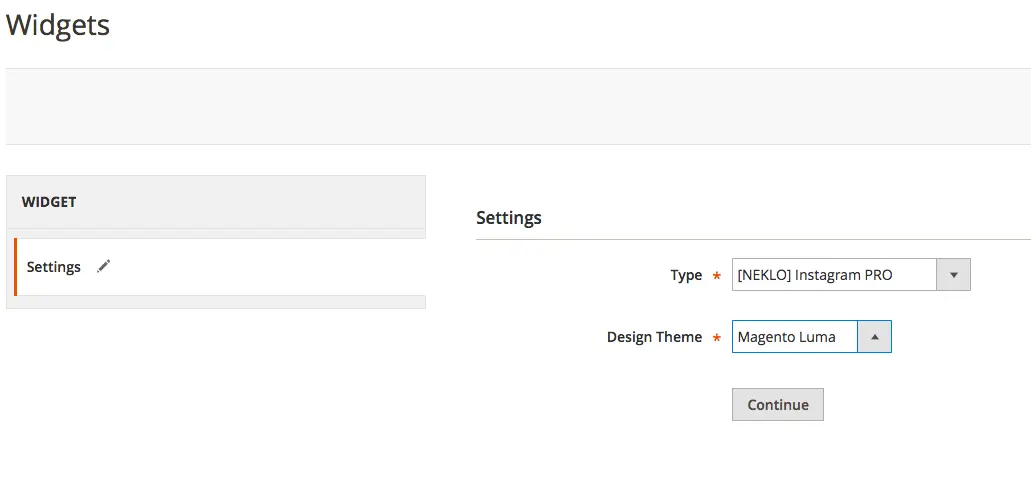
Create your first Instagram Integration Widget
Go to Content > Elements > Widgets and click on Add Widget. To set the Instagram Integration Widget, set the Type [NEKLO] Instagram Widget and choose the relevant design theme.

See the main configurations of the widget
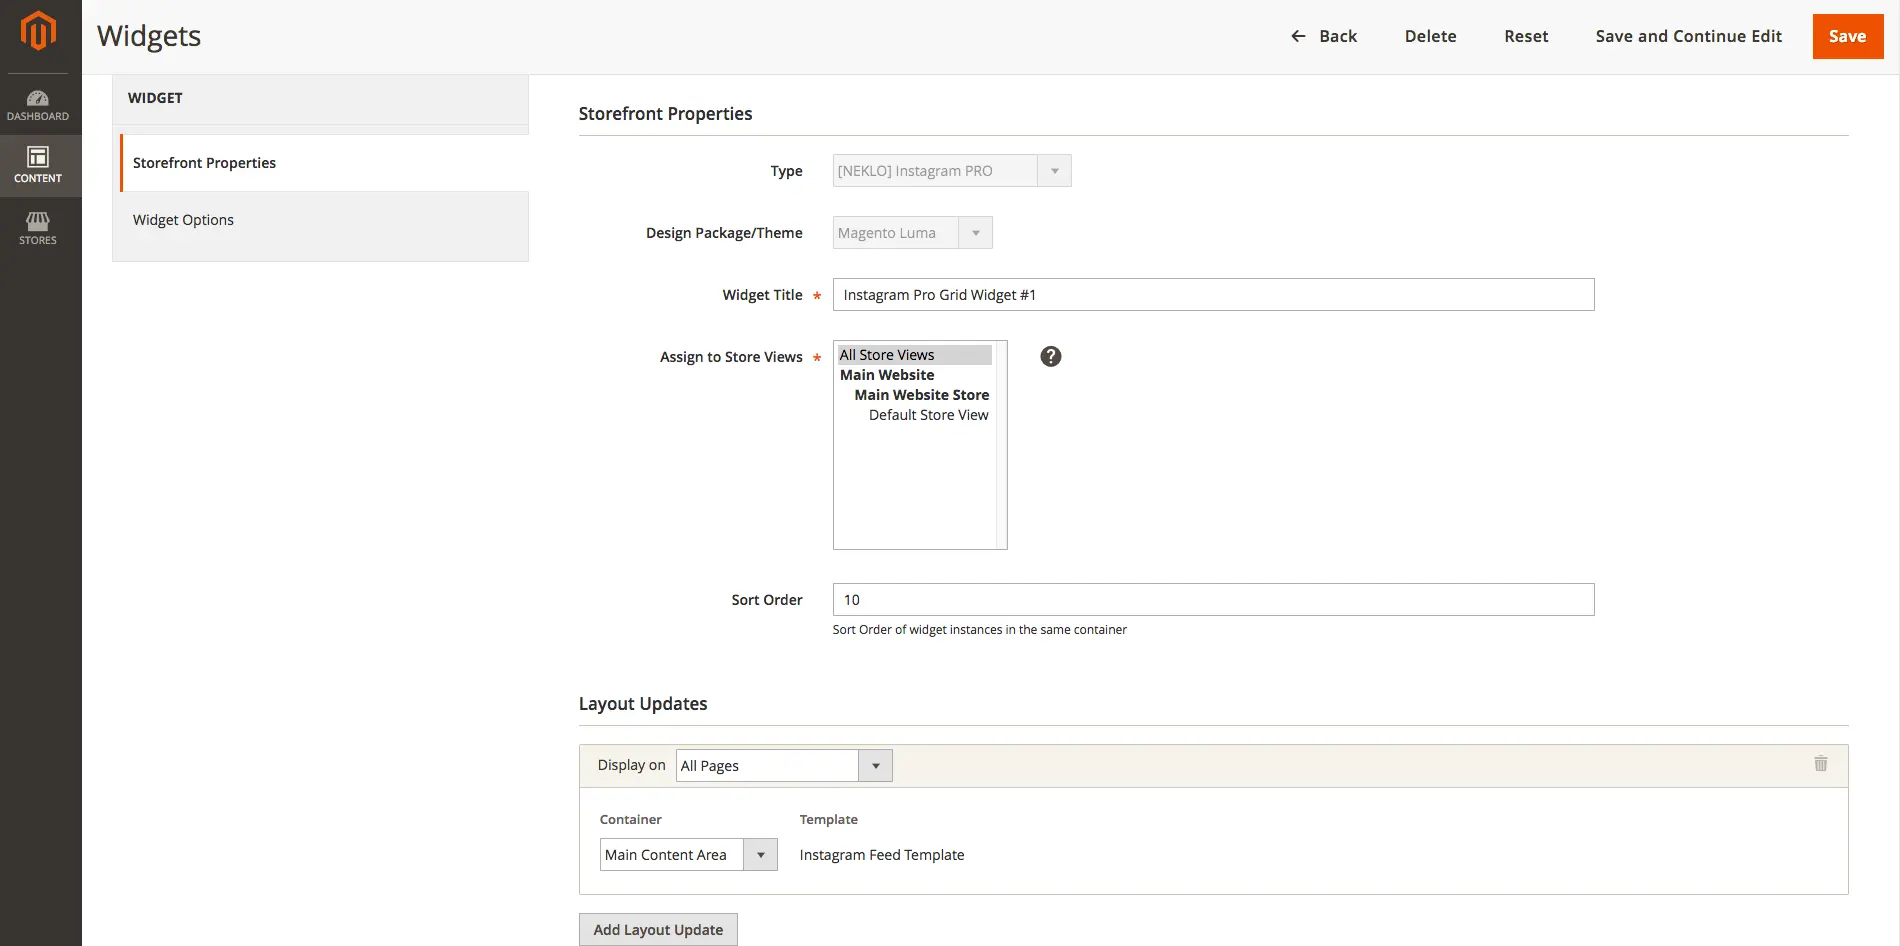
Find the tab Storefront Properties when you add a new widget or edit the existing one.

Set a particular Layout Update for the widget
Indicate an exact page and a place on it for your Instagram widget.

Find the customization settings
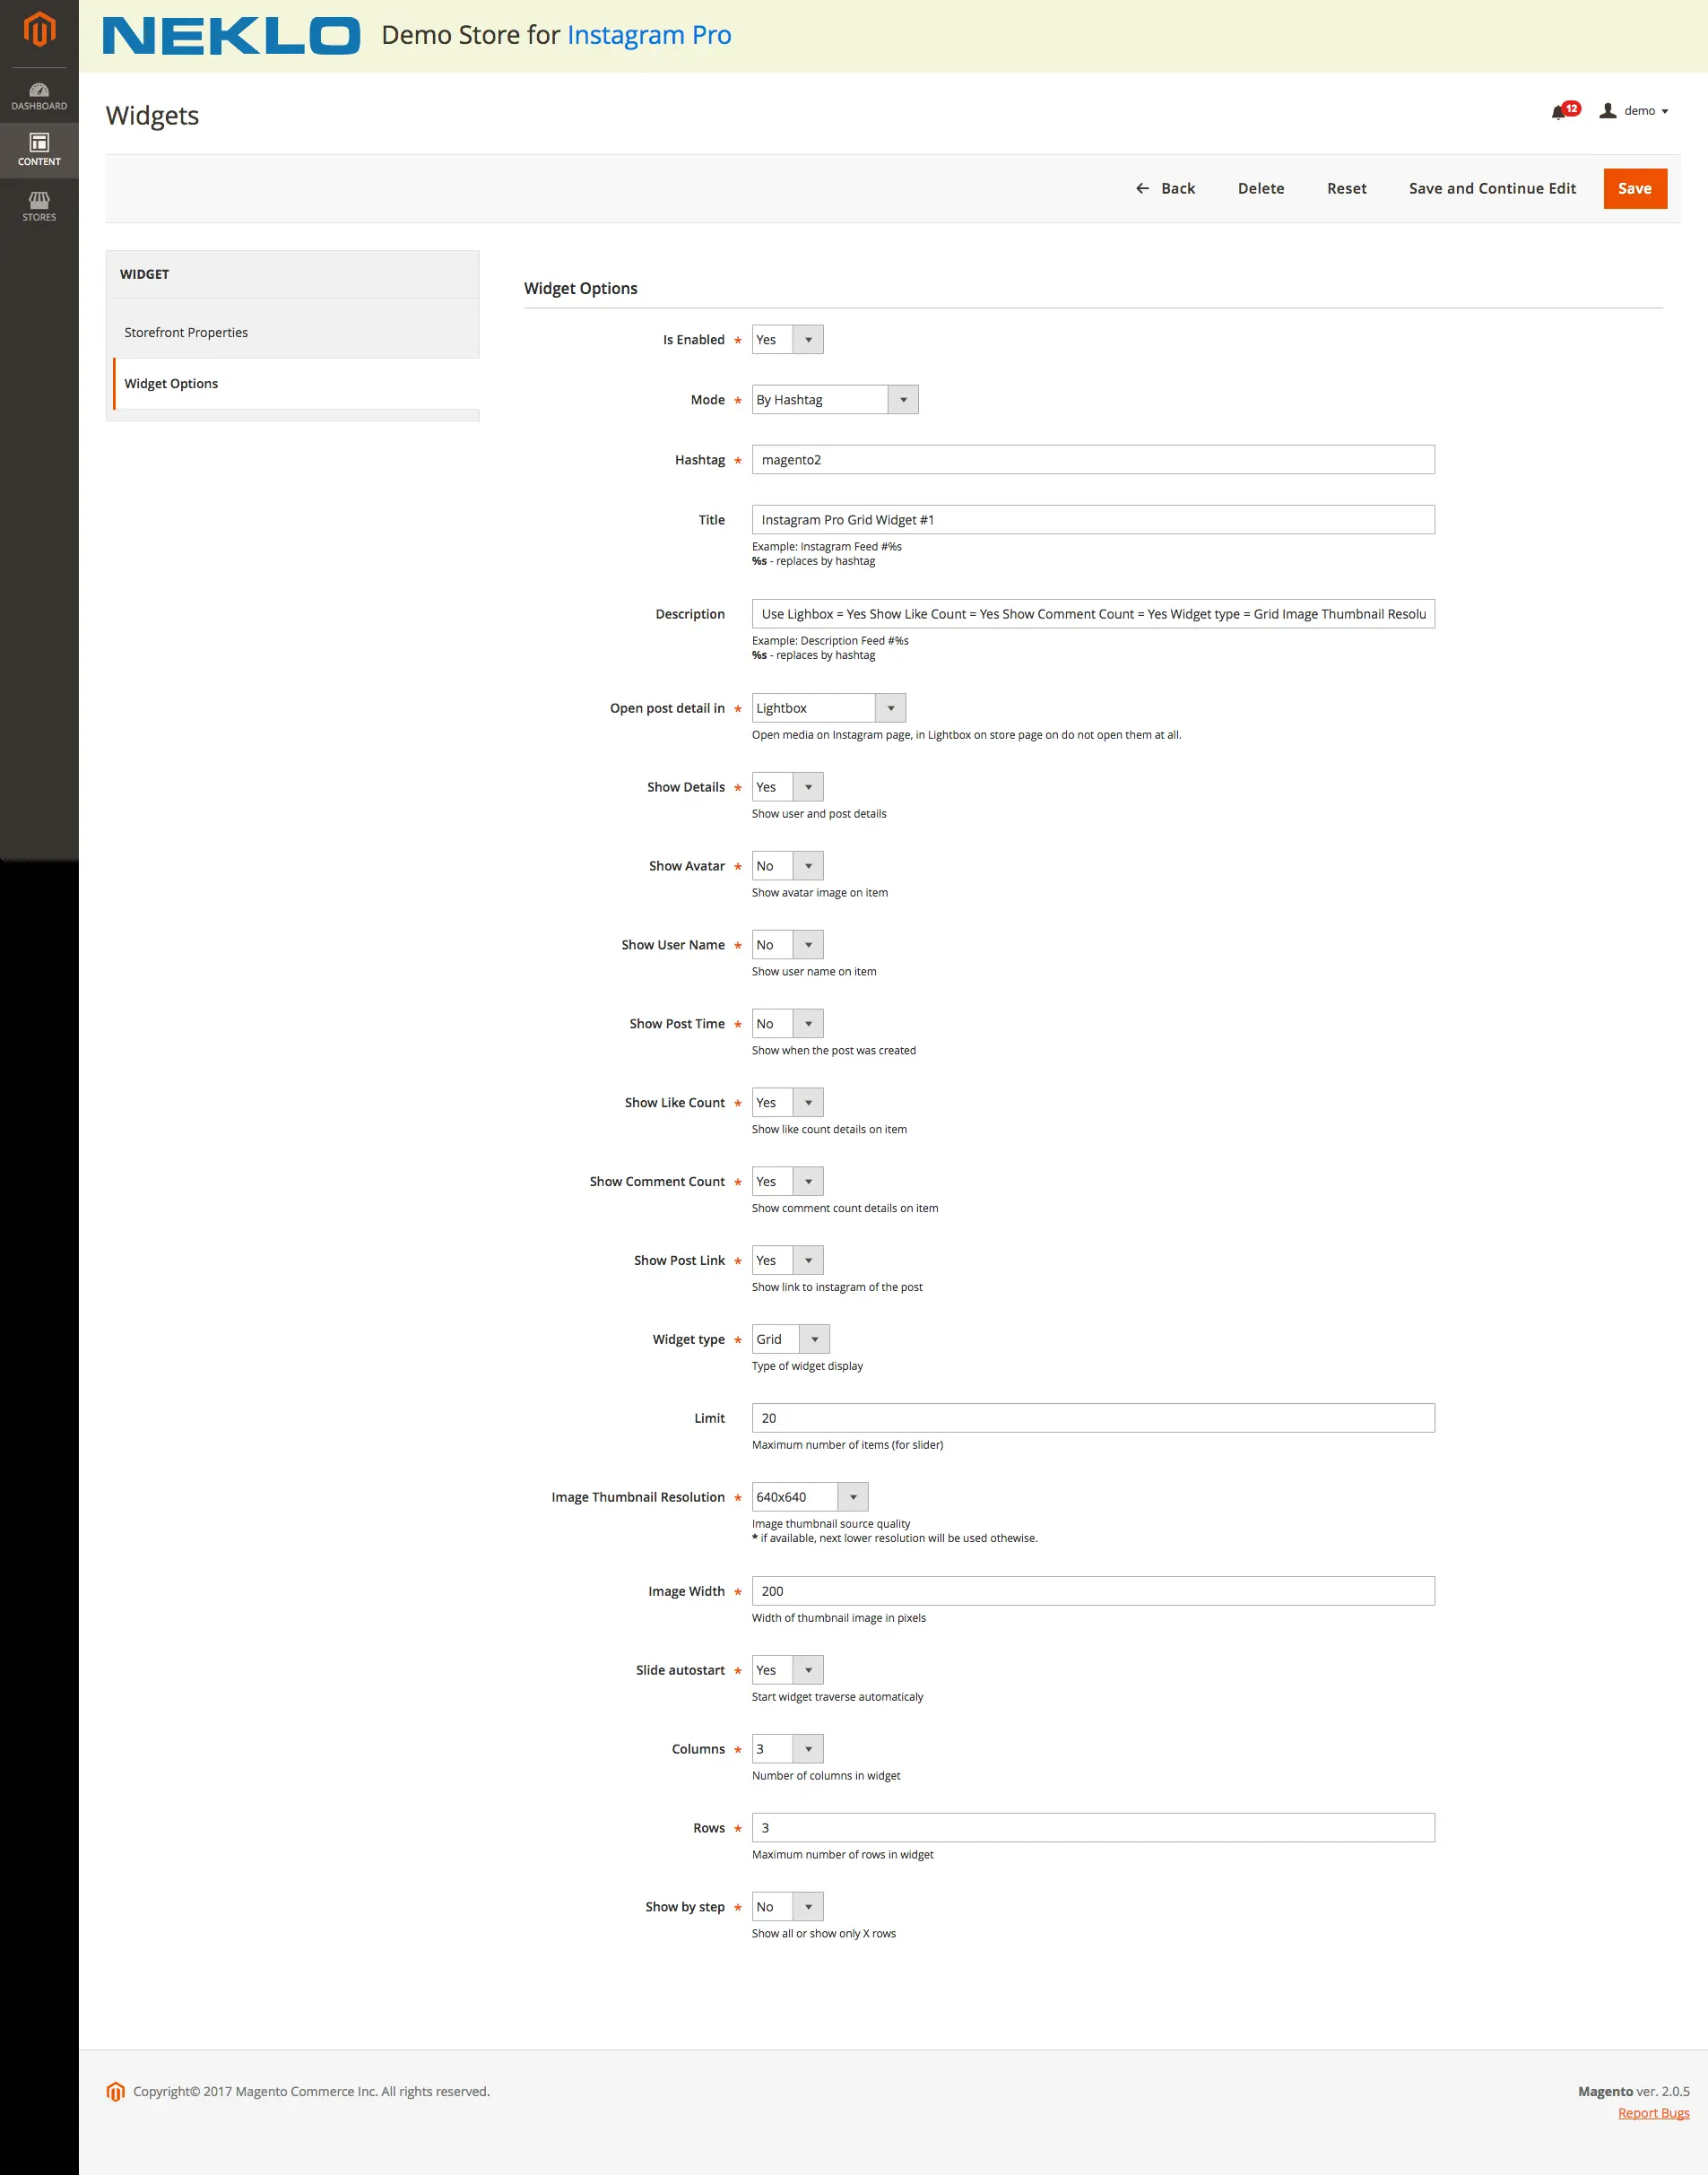
Proceed with adjusting the widget by selecting the tab Widget Options. Here you will find other settings for your widget.

View the remaining configurations applicable for the content
Proceed with adjusting the widget by selecting the tab Widget Options. Here you will find other settings for your widget.

See the set widget on frontend
After you set everything correctly, go to the frontend of your website and check the widget appearance with your own eyes.
Start Set up a widget Storefront Properties Layout Update Widget Options Additional content settings Frontend

Write Your Own Review
Features of Instagram Pro Widget for Magento 2
What Instagram Pro Widget does
Instagram Pro Widget offers a number of settings for you to adjust the image block the way you like. Choose pages and an exact place on them to show Instagram feed, set the TItle and the Description of a block, display posts information, and settle the amount of photos. Enjoy all the features of Instagram Pro WIdget.
Manage the basic settings
Enable and disable the extension quick and easy without removal
In its settings, Instagram Pro Widget has one field that can enable or disable the whole extension. If you need to check something on your store or you change something in your design, just simply turn the extension off for a while. Then, when everything is done, enable it again with no troubles.
Have your cached posts deleted after a while
The extension has an option to set Cache Lifetime that regulates the period of being the posts in cache. After the set time expires, they will be deleted. Decide on for how long you want the posts to be stored and enter this time in your Admin Panel. Remember that cached posts load faster.
Deal with the widget appearance
Choose the Store Views for your widget to be assigned to
If you have multiple stores, like variants of the same store for different languages, you can appoint the widget to all of them. Moreover, you can create one widget for one Store View and another one for all the rest. Instagram Pro Widget supports this function as well.
Set the location of a widget
Have your Instagram Widget be displayed on pages you want
The widget lets you create a layout update, where you can point out the page for the widget display. It is a convenient option allowing you post the Instagram feed on one, several, or all the pages of your website. Consider the focus of a particular page and decide whether it is profitable to post a widget there.
Indicate the exact place for the widget
Layout Updates have another quite useful feature. It allows you to enter the exact place on a page, where your widget will be displayed. Choose a Footer or a Header and attach your widget to this web page area.
Regulate the display of a widget
Show and hide a particular widget without removing it
In Instagram Pro Widget you can settle the display of a particular widget. Turn it on and off when necessary without deleting it and losing your settings.
Choose one of the four ways of showing photos in your feed
There are four selecting photos modes available for you: by User Name, by Hashtag, by Category Hashtag, by Product Hashtag. You don’t even need to connect your Instagram account to your Magento. Just set the desired hashtag or user name, whose posts you want to display. A simple option aimed at simplifying the photos sorting process.
Make your widget unique
Give your widget a name and a small presentation
Name your every widget to give your clients a glimpse of what you want to show them. Make every image block unique with individual descriptions of the content. Tell your clients a bit more about the photos shown - it will add individuality to the posts instead of just showing random images.
Configure the post information appearance
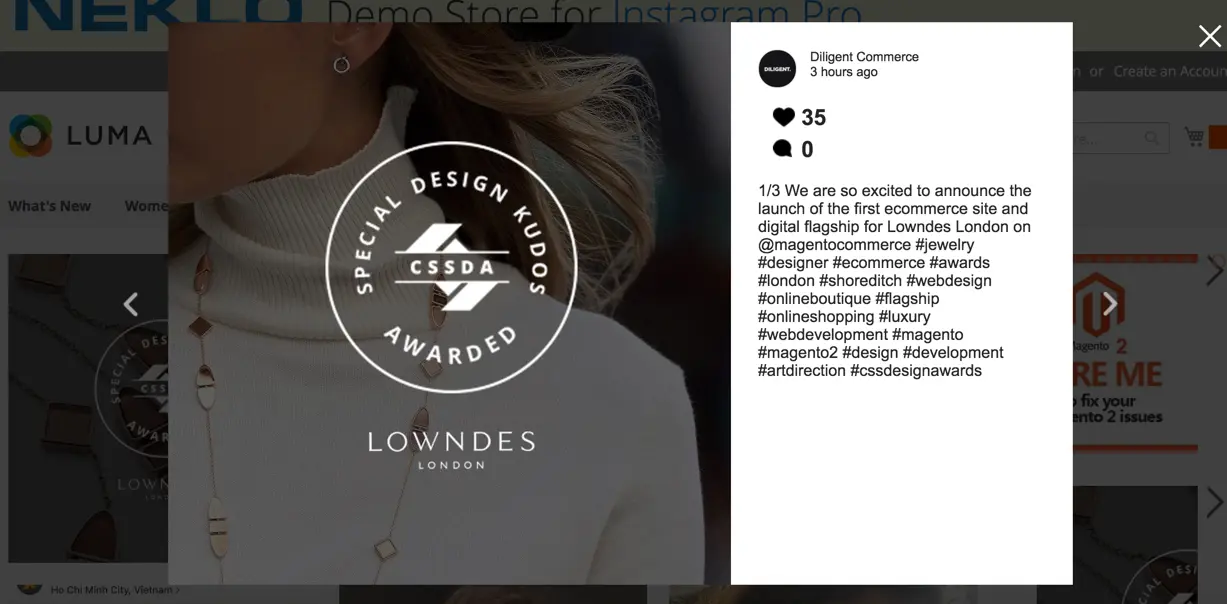
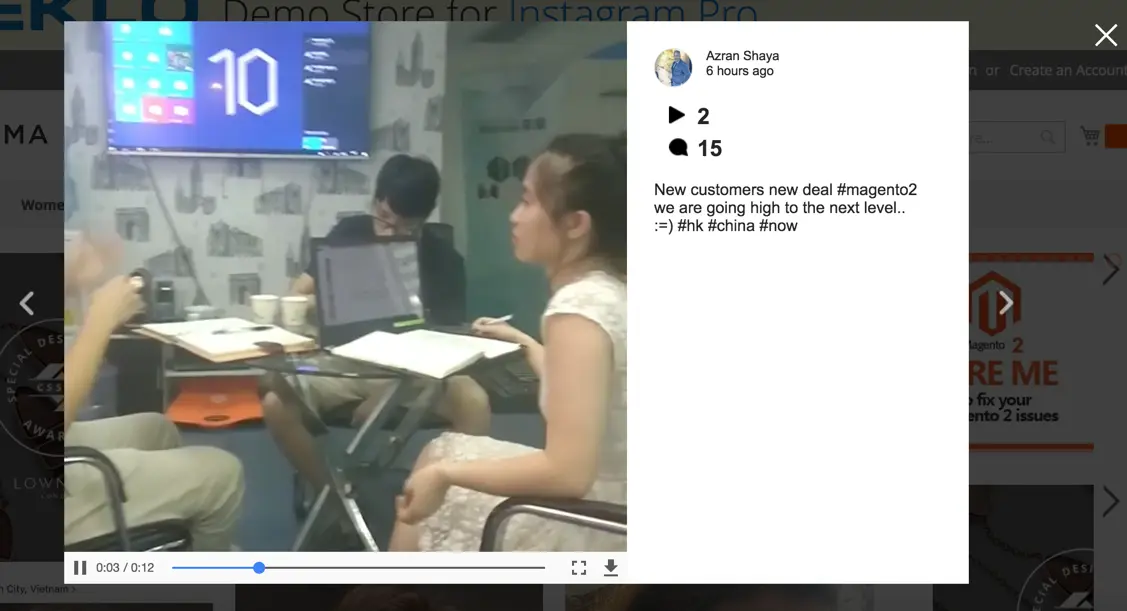
Reveal the posts information on your website or redirect users to Instagram. Or don’t show anything at all.
Instagram Pro Widget allows you to open photos in a separate Lightbox for users’ conveniency. Here you can let the widget show posts information on your website. Still, you have the possibility to forbid Lightbox and redirect users to the correspondent Instagram account with this photo. Moreover, you are able not to show any information about photos at all.
Set the post information you want to show
Not only you can show and hide post details, you can also regulate the information to display. For example, your users can see the author’s name and like count, but the date of creation can be hidden for them. You set the rules here.
Set how your posts will be shown
Choose the view of the Instagram feed
Instagram Pro Widget supports two views of your Instagram feed: as a slider and as a grid. Choose the way that suits your design better and apply it to your website.
Have your posts be shown automatically
Let your visitors see all your posts without even clicking on the block. Turn Autostart on and your images will be displayed on their own. Set constant photo presentation if you want.
Set the maximum amount of given images
Sometimes there are too many photos of an author or under one hashtag and it is irrelevant to show all of them. Display only the newest ones that your clients will find interesting. Set the maximum number of photos that are taken from a certain Instagram account or shown under one hashtag. Decide on the best amount for you and set it in your Admin Panel.
General configurations of Instagram Pro Widget
Turn the extension on and delete cache when necessary
Instagram Integration Pro is easy to turn on and off when necessary. By using only one option you can quickly enable and disable the extension without losing your settings. To do so, go to Stores > Settings > Configuration > NEKLO tab > Instagram Pro Widget. Here you will find the field “Enabled” that is responsible for displaying of the extension.
Clear cached photos automatically
Another feature you will find in this tab is Cache Lifetime. It allows you to set specific time period that regulates the existence of cached images. The bigger number in seconds you set the longer these photos will be kept. Just remember that cached photos load faster, but soil your server’s memory.
Set the frontend display
Customize Storefront properties
To set your first Instagram Pro Widget, go to Content > Elements > Widgets and click on “Add Widget”. You will see the tab with Storefront properties. After choosing the correspondent type and design theme of the widget, you will see its additional settings. For example, here you will be able to name your widget in order to find it quicker.
Then you can assign it to a number of Store Views - that makes it easier to work, for example, with the same page on multiple languages. Sort Order sets the numerical order of this widget among others in one container.
Choose the page and exact place on it
On this tab you can also indicate the page or a number of them, where your widget will be shown. Let your visitors see it, for example, on CMS page or even on all pages. Moreover, add here the page block Instagram widget will be assigned to. It can be shown in a page header, in a column, or in other place you like. Choose the settings that suit your website the best.
Widget Options
Switch it on and choose the source of the photos
If you proceed to the Widget Options tab to the left, you will see other options for your widget. You can hide any widget easily with selecting “No” in the “Is Enabled” field. It saves time and releases you from losing all your settings, when you need, for example, test other modules.
You can also set one of the three possible modes, where your photos will be taken from. If you choose “By User Name”, then the photos of an indicated user will be shown. It can be your account of your friend’s - it doesn’t matter. Another option here is “By Hashtag”. Here you only need to set a hashtag and all the posts that comply with it will be shown on your website.
The remaining options “By Product Hashtag” and “By Category Hashtag” will sort the photos according to the exact hashtag set on their Category and Product pages in the backend. No need to add anything.
Regulate the content appearance
Adjust the content of your widget
Some users prefer to see the posts details on your website without leaving it. For this purpose the option “Open post details” is made. Just set here “in Lightbox” and upon clicking a lightbox with post information will appear. If you want to redirect users to a correspondent Instagram account, then set “Instagram page”. It will help you gain more subscribers for your account. Additionally, you can hide all the details and not redirect users anywhere. Indicate “Do not open details” and the job is done.
Further you can choose which information you would like to be
shown, like Comment Count and Post Time. There is a number of options
to regulate, so decide on the right information for you. A bit lower you
can set the appearance of your widget. Indicate the number of visible items,
slide autostart, its speed, etc. These are additional options for your widget
to improve User Experience.
Tell your users what they see
Photos alone is a good thing, but it is better, when you can tell your visitors about what is going on here or why you show them in one block. Add a specific Title and Description for every widget published. Thus, you will make it easier to understand for your users. Especially, when you perform a specific event with photos.
How to install Instagram Pro Widget for Magento 2?
- Install library using console command: composer require raiym/instagram-php-scraper
- Unpack the zip file provided into the root folder of your Magento 2 installation.
- From a command line run:
bin/magento module:enable Neklo_Core
bin/magento module:enable Neklo_Instagrampro
bin/magento setup:upgrade
bin/magento setup:static-content:deploy - In your admin panel, go to System > Cache Management and flush Magento cache.
- Log out from Magento and login to reload ACL (account control level) rules.
- To start working with the extension, go to Stores > Configuration > NEKLO > Featured Products and enable the extension. After that, you can proceed to Catalog > Categories to select featured products.
Frequently Asked Questions
How to install a Magento extension by NEKLO?
1. Disable Compilation mode if it is enabled (System - Tools - Compilation).
2. Unpack the archive purchased from our Magento Store and copy the contents of the ‘extension’ folder to the root folder of your Magento installation.
3. Log out from Magento Admin panel if you are logged in and then log back.
4. Clear the cache. If Cache Control is enabled in Magento go to ‘System > Cache Management’ section, select ‘Refresh’ under ‘All Cache’ drop-down menu and press ‘Save Cache Settings’.
5. Go to ‘System > Configuration > NEKLO tab > Extensions & Contact’ section and check the list of extensions installed for the name of your purchased extension. If it is in the list the installation is complete.
I’m running several stores, shall
I buy a separate extension for each of them or it is possible to use one extension?
You can use one extension per one live Magento installation. It
means that if you run multiple stores on same one Magento installation, you just
buy our extension once and then use it for all your stores.
In case your stores run on separate live Magento installations, you need to buy an extension for each of them.
In case your stores run on separate live Magento installations, you need to buy an extension for each of them.
I’m getting this error: SQLSTATE[23000]: Integrity constraint violation. What shall I do?
Next time, please, disable the compilation
mode prior to uploading the extension files to your server.
And now, please, follow these steps:
1. Open app/etc/local.xml
2. Replace
<disable_local_modules>false</disable_local_modules> with
<disable_local_modules>true</disable_local_modules>
3. Log in to admin panel and disable the compilation.
4. Revert the changes in the local.xml
5. Clear the cache.
And now, please, follow these steps:
1. Open app/etc/local.xml
2. Replace
<disable_local_modules>false</disable_local_modules> with
<disable_local_modules>true</disable_local_modules>
3. Log in to admin panel and disable the compilation.
4. Revert the changes in the local.xml
5. Clear the cache.
There’s a "404 Not Found" error when opening configuration page.
Please, log out and then log back into the backend, so Magento can refresh permissions.
How to uninstall the extension?
To completely uninstall any of our extensions, first start from disabling it. To disable the extension, please follow the next steps:
1. Edit … file (where XXX stands for the extension name/code).
2. Change "true" to "false".
3. Clear the cache.
At this point the extension is completely disabled and is not visible for Magento.
Now you can safely remove the extension files, although it is not necessary.
1. Edit … file (where XXX stands for the extension name/code).
2. Change "true" to "false".
3. Clear the cache.
At this point the extension is completely disabled and is not visible for Magento.
Now you can safely remove the extension files, although it is not necessary.
How to disable your extension?
To disable any of our extensions, please, follow this algorithm:
1. Edit app/etc/modules/Neklo_XXX.xml file (where XXX stands for the extension name/code).
2. Change "true" to "false".
3. Clear the cache.
As soon as you have done it the extension is disabled completely, meaning it no longer affects any Magento functionality.
1. Edit app/etc/modules/Neklo_XXX.xml file (where XXX stands for the extension name/code).
2. Change "true" to "false".
3. Clear the cache.
As soon as you have done it the extension is disabled completely, meaning it no longer affects any Magento functionality.
How to translate an extension?
There are two options for translating your Magento extension.
1. Please open app/locale/en_US/ Neklo_XXX.csv, copy it to your locale folder, for example to app/locale/de_DE/ Neklo_XXX.csv and change the wording after the "," so the line will look like "Product review","Testbericht".
2. If there are the necessary language packs installed, you can use inline translation. To do that, please, go to admin/system/configuration/ developer, choose the storeview you want to translate and enable inline translation for it. Then go to the front end, select text and translate.
How to update NEKLO extension?
1. Log in into your account
2. Download the extension (it will be always the latest extension version)
3. Unpack the downloaded folders
4. Disable the Compilation mode in Magento
5. Upload the overwriting existent files of our extensions to Magento root folder (please note that if you customized the files of our extension, the customizations will be overwritten)
6. Refresh site cache (if it\'s enabled)
7. Re-run the Compilation mode