Recently Sold Widget
v1.1.4

2.3.x - 2.4.x
2.3.x - 2.4.x
Recently Sold is a Magento 2 widget that displays your products that enjoy popularity right now. This Magento 2 plugin shows products your customers choose to star, buy, or just put into the cart, which attracts attention and increases the upsell opportunities.
Our Magento 2 module helps you to offer ideas for the next purchase to your website visitors. Additionally, NEKLO’s Magento 2 module allows you to place this Magento 2 custom widget anywhere in a storefront to attract an eye.
Our Magento 2 module helps you to offer ideas for the next purchase to your website visitors. Additionally, NEKLO’s Magento 2 module allows you to place this Magento 2 custom widget anywhere in a storefront to attract an eye.
- Product information collected automatically
- Storefront configurations for the tab contents
- Can be placed anywhere on the store
- Native Magento 2 widget configuration

Set up your first Recently Sold Widget
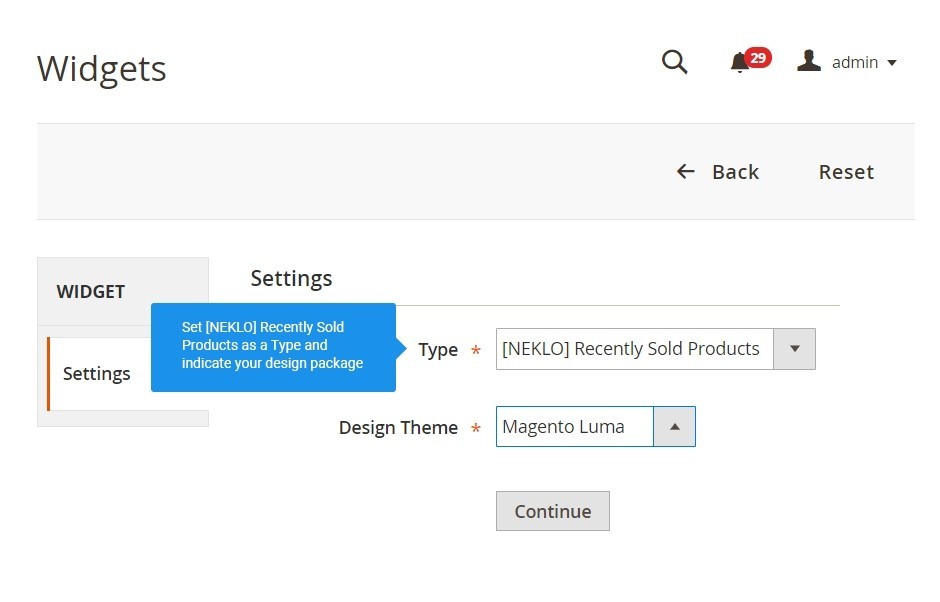
Go to CMS > Widget and click on Add Widget. Set here the necessary information and have your first Recently Sold Widget added to your store.

Find the main settings of a widget
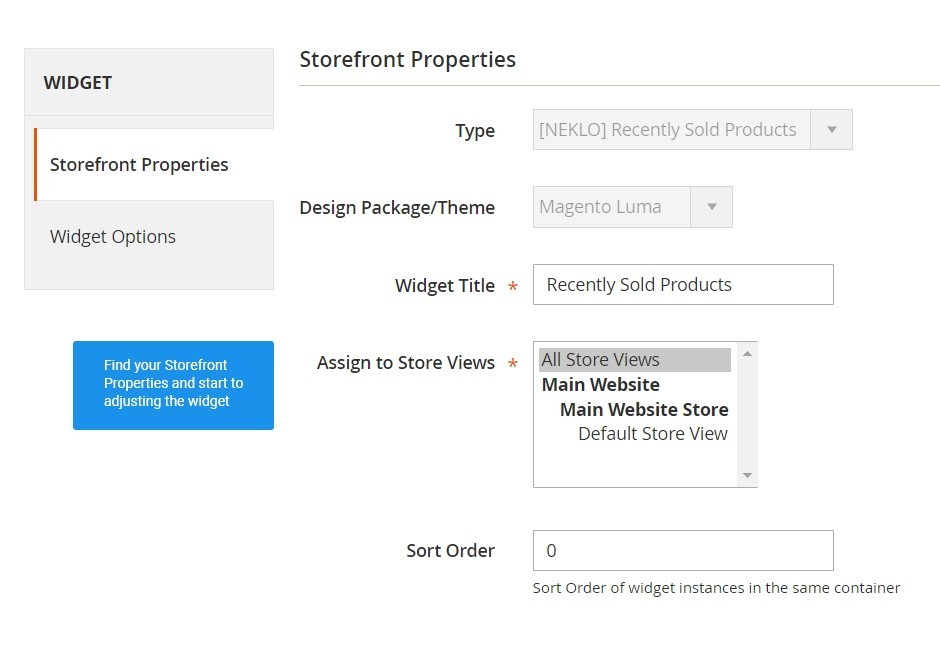
When you create a new widget or edit the existing one, you will appear on the tab Storefront Properties with general settings.

Set the exact location for your widget
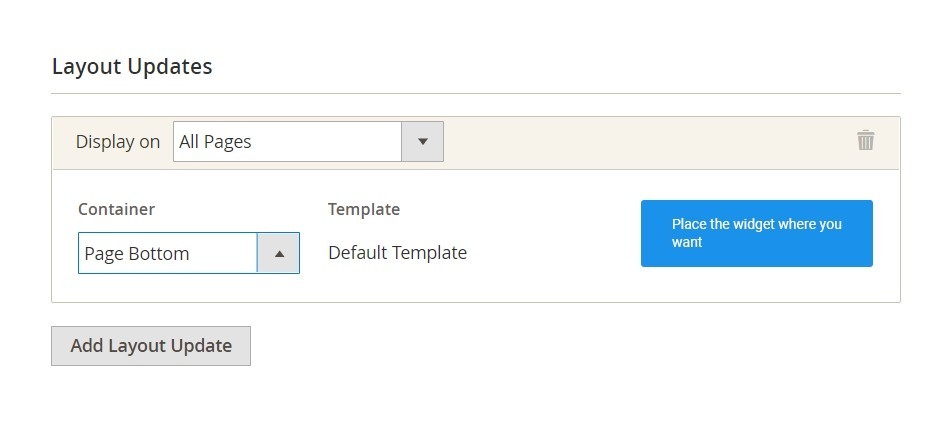
Add Layout Update and thus indicate the exact container to assign your widget to.

Configure the set widget
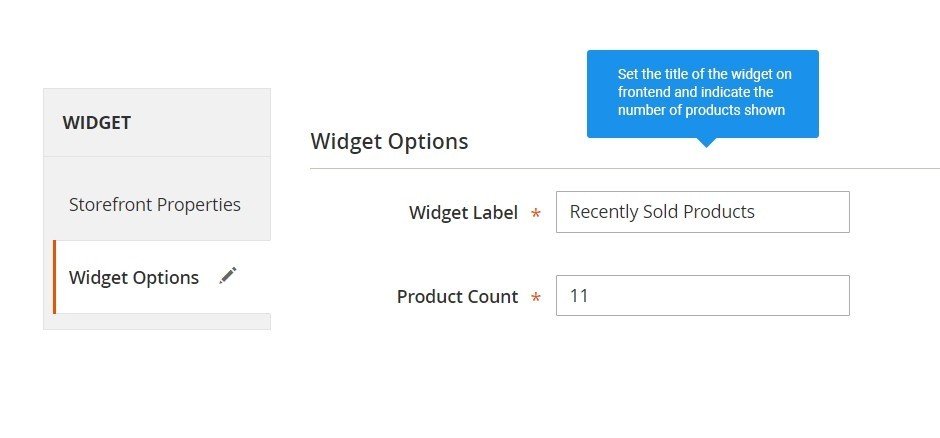
Go to the tab Widget Options to find configurations responsible for the widget appearance on frontend.

See how your widget is displayed on frontend
Add the widget to any place of your website and check its appearance then.
Add a widget
Storefront Properties
Layout Update
Widget Options
Recently Sold Widget
Write Your Own Review
VERSION 1.1.4
23.04.2025
Compatible with CE: 2.3.x - 2.4.x
Compatible with EE: 2.3.x - 2.4.x
Stability: Stable Build
Description:
Compatibility with Magetno 2.4.4, bug fixes
Compatible with EE: 2.3.x - 2.4.x
Stability: Stable Build
Description:
Compatibility with Magetno 2.4.4, bug fixes
VERSION 1.1.2
26.07.2022
Compatible with CE: 2.3.x - 2.4.x
Compatible with EE: 2.3.x - 2.4.x
Stability: Stable Build
Description:
Compatibility with Magetno 2.4.4
Compatible with EE: 2.3.x - 2.4.x
Stability: Stable Build
Description:
Compatibility with Magetno 2.4.4
Extension Features
Quick and simple installation
Recently Sold Magento 2 custom module is a small tool
with benefits such as no additional load to your servers; no reduced page load speed; an
improved customer experience. Installation and configuration for this custom Magento extension
are clear and will not require additional technical assistance.
Clear settings, nothing extra
The Recently Sold Magento 2 module requires only a few
steps to add its functionality to your website. Specify a title for the widget and define the
number of products to display. Our Magento 2 custom widget module won’t get you into a mess with
countless options.
Automatic widget enabling
NEKLO’s custom Magento module is enabled automatically
after the installation. No need to switch it on manually, just start creating your widget
immediately.
Widget properties and options
You can select from the standard Magento configurations
of widgets adding and editing, including assignment to Store Views, Widget’s title, and Sort
Order. You can also add a Layout Update to assign your widget to a particular place on the
website.
Frequently Asked Questions
How to install a Magento extension by NEKLO?
1. Disable Compilation mode if it is enabled (System - Tools - Compilation).
2. Unpack the archive purchased from our Magento Store and copy the contents of the ‘extension’ folder to the root folder of your Magento installation.
3. Log out from Magento Admin panel if you are logged in and then log back.
4. Clear the cache. If Cache Control is enabled in Magento go to ‘System > Cache Management’ section, select ‘Refresh’ under ‘All Cache’ drop-down menu and press ‘Save Cache Settings’.
5. Go to ‘System > Configuration > NEKLO tab > Extensions & Contact’ section and check the list of extensions installed for the name of your purchased extension. If it is in the list the installation is complete.
I’m running several stores, shall I buy a separate extension for each of them or it is possible to use one extension?
You can use one extension per one live Magento installation. It
means that if you run multiple stores on same one Magento installation, you just
buy our extension once and then use it for all your stores.
In case your stores run on separate live Magento installations, you need to buy an extension for each of them.
In case your stores run on separate live Magento installations, you need to buy an extension for each of them.
I’m getting this error: SQLSTATE[23000]: Integrity constraint violation. What shall I do?
Next time, please, disable the compilation
mode prior to uploading the extension files to your server.
And now, please, follow these steps:
1. Open app/etc/local.xml
2. Replace
3. Log in to admin panel and disable the compilation.
4. Revert the changes in the local.xml
5. Clear the cache.
And now, please, follow these steps:
1. Open app/etc/local.xml
2. Replace
3. Log in to admin panel and disable the compilation.
4. Revert the changes in the local.xml
5. Clear the cache.
There’s a "404 Not Found" error when opening configuration page.
Please, log out and then log back into the backend, so Magento can refresh
permissions.
How to uninstall the extension?
To completely uninstall any of our extensions, first start from disabling it. To disable the
extension,
please follow the next steps:
1. Edit … file (where XXX stands for the extension name/code).
2. Change "true" to "false".
3. Clear the cache.
At this point the extension is completely disabled and is not visible for Magento.
Now you can safely remove the extension files, although it is not necessary.
1. Edit … file (where XXX stands for the extension name/code).
2. Change "true" to "false".
3. Clear the cache.
At this point the extension is completely disabled and is not visible for Magento.
Now you can safely remove the extension files, although it is not necessary.
How to disable your extension?
To disable any of our extensions, please, follow this algorithm:
1. Edit app/etc/modules/Neklo_XXX.xml file (where XXX stands for the extension name/code).
2. Change "true" to "false".
3. Clear the cache.
As soon as you have done it the extension is disabled completely, meaning it no longer affects any Magento functionality.
1. Edit app/etc/modules/Neklo_XXX.xml file (where XXX stands for the extension name/code).
2. Change "true" to "false".
3. Clear the cache.
As soon as you have done it the extension is disabled completely, meaning it no longer affects any Magento functionality.
How to translate an extension?
There are two options for translating your Magento extension.
1. Please open app/locale/en_US/ Neklo_XXX.csv, copy it to your locale folder, for example to app/locale/de_DE/ Neklo_XXX.csv and change the wording after the "," so the line will look like "Product review","Testbericht".
2. If there are the necessary language packs installed, you can use inline translation. To do that, please, go to admin/system/configuration/ developer, choose the storeview you want to translate and enable inline translation for it. Then go to the front end, select text and translate.
How to update NEKLO extension?
1. Log in into your account
2. Download the extension (it will be always the latest extension version)
3. Unpack the downloaded folders
4. Disable the Compilation mode in Magento
5. Upload the overwriting existent files of our extensions to Magento root folder (please note that if you customized the files of our extension, the customizations will be overwritten)
6. Refresh site cache (if it\'s enabled)
7. Re-run the Compilation mode
Installation of the Recently Sold Widget by NEKLO Magento module store?
To install the Recently Sold Widget, you don’t need any special skills. First of all, you should have FTP/SSH access details for proper install-m2ation. Then the process begins:
1
2
3
4
5
6
