Pinterest Widget
v1.0.1

2.1.x - 2.3.x
2.1.x - 2.3.x
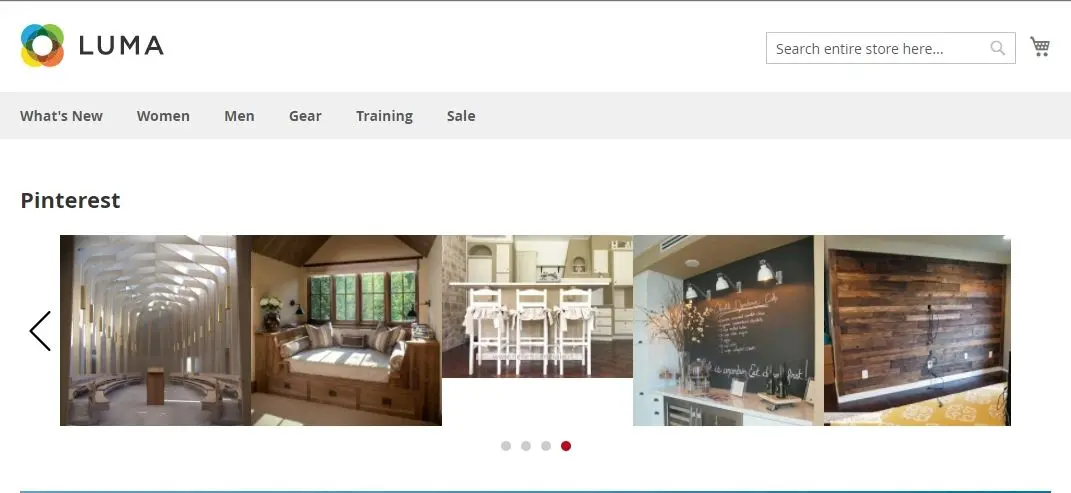
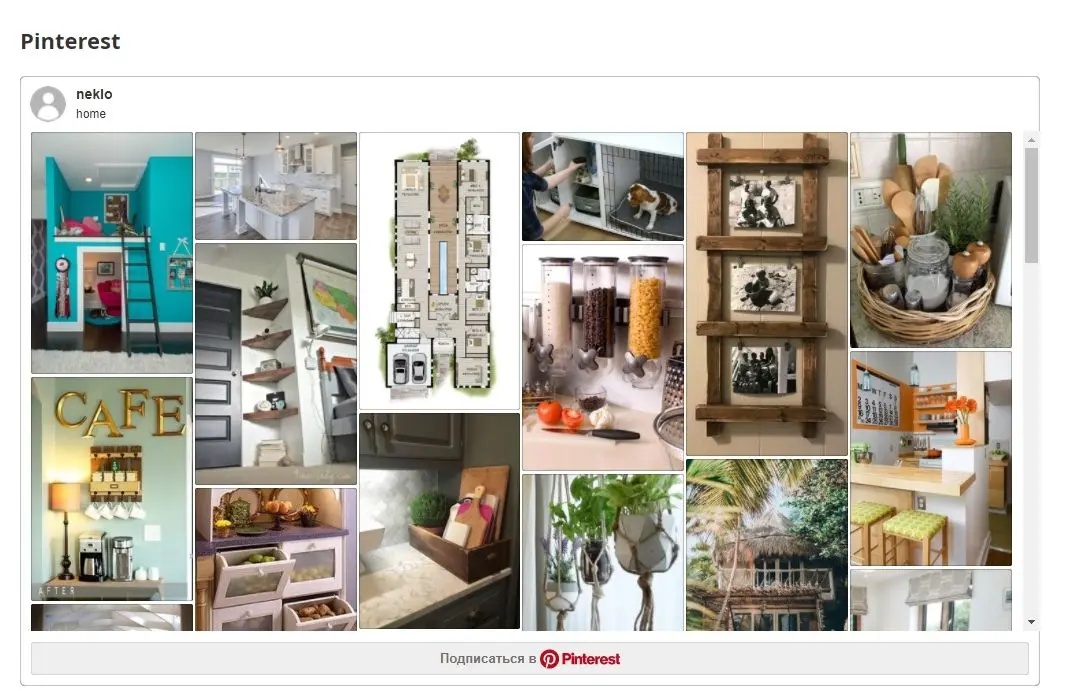
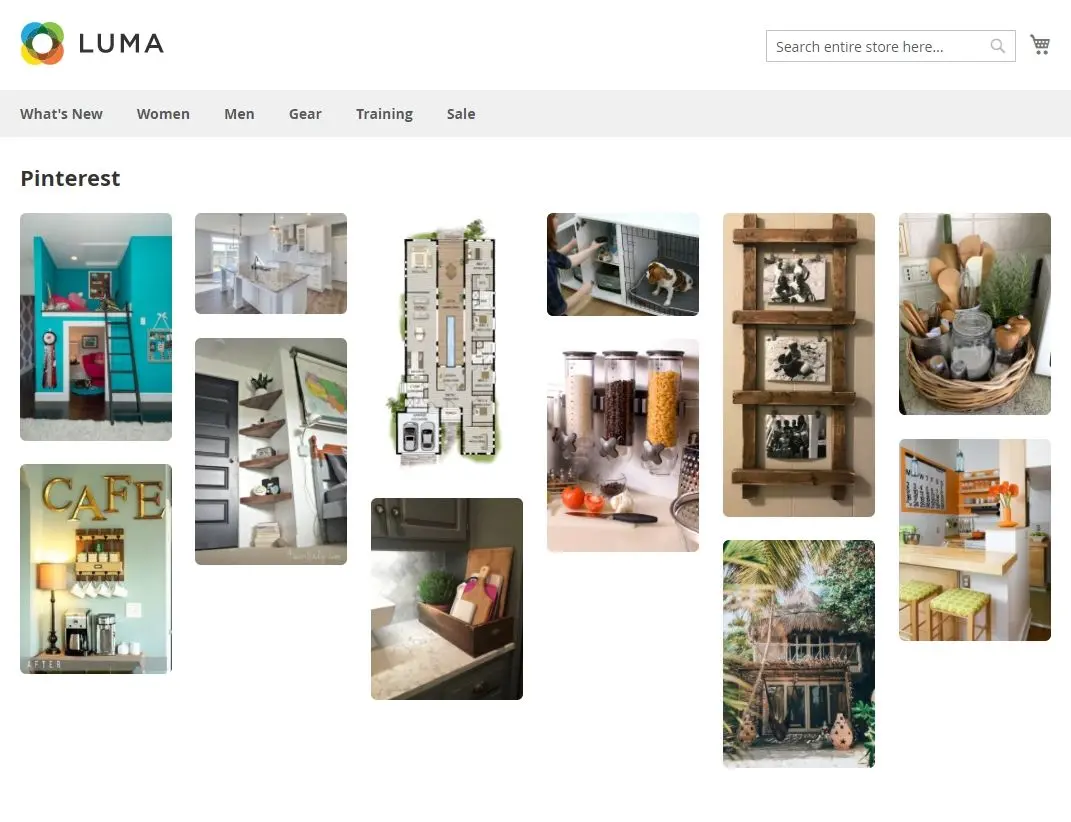
Magento 2 Pinterest Widget by NEKLO is a convenient custom Magento extension that allows for displaying boards with captivating images from Pinterest profiles in your Magento online store.
NEKLO Pinterest Widget is a powerful purchase tool that inspires your customers to make buying decisions based on what they see on the eye-catching Pinterest pins. So Magento Pinterest extension makes a great way to push forward your brand’s products.
Additionally, this Magento 2 plugin helps to improve the user experience by promoting useful and related content.
- Connect any Pinterest board you like
- Use three ways of displaying pins
- Put your Pinterest board on any page of your store
- Promote popular and useful content
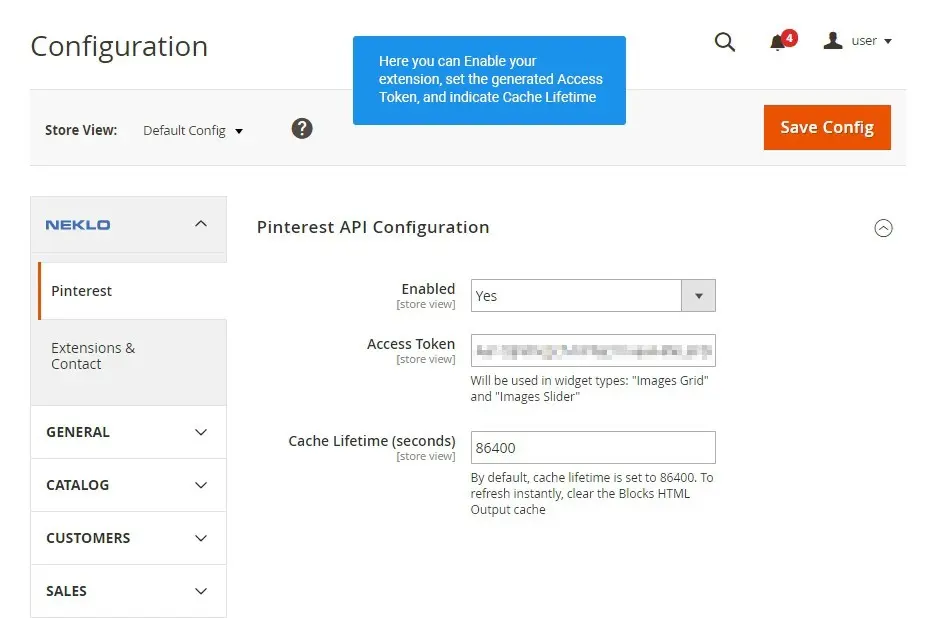
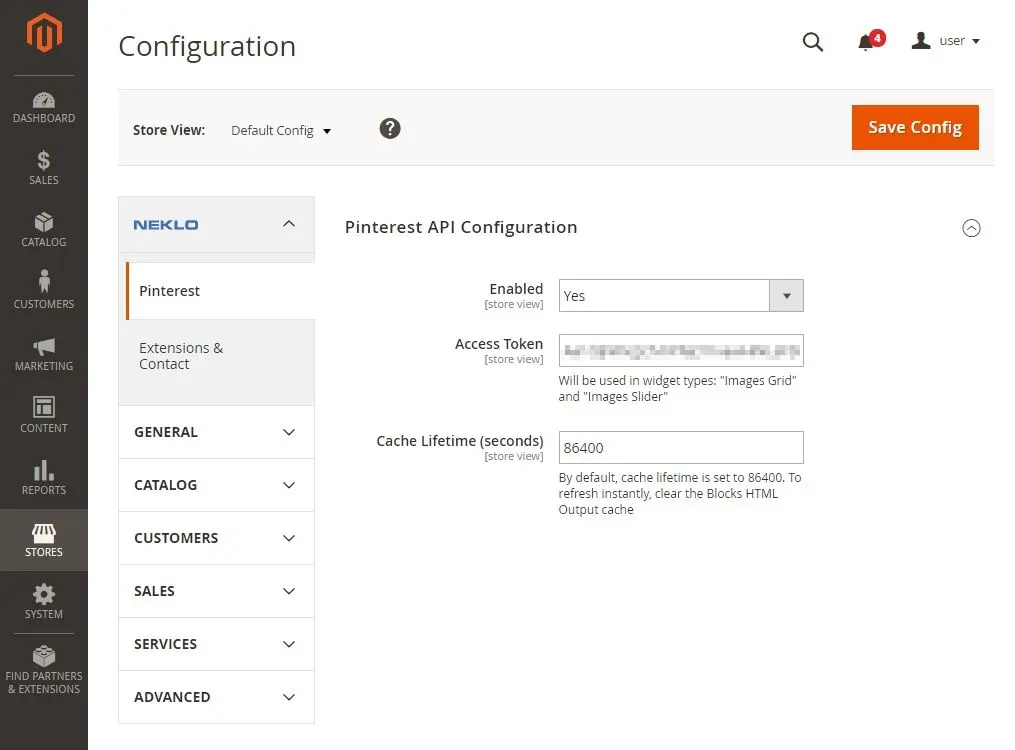
The page with main configurations
Find the main configurations of Pinterest Widget
following Stores > Configuration > Neklo > Pinterest.
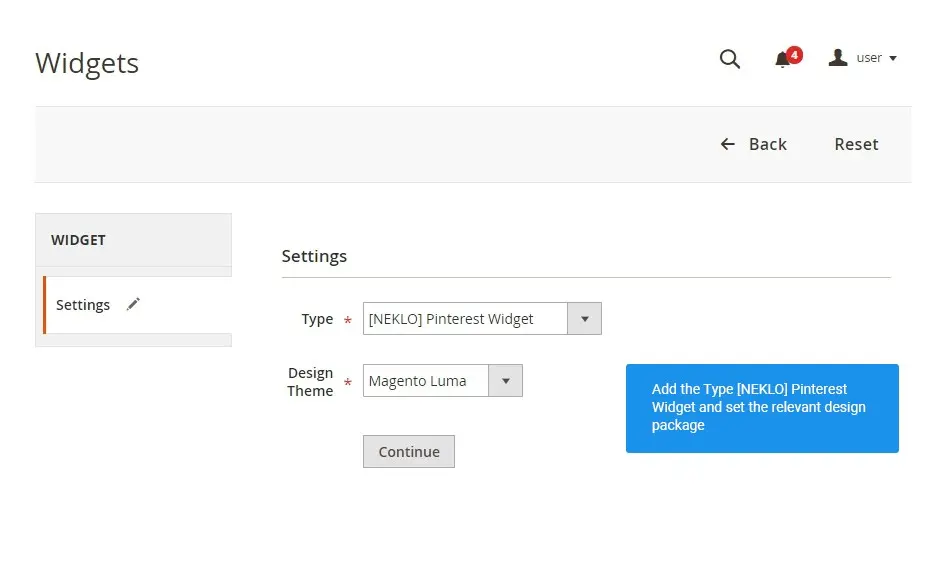
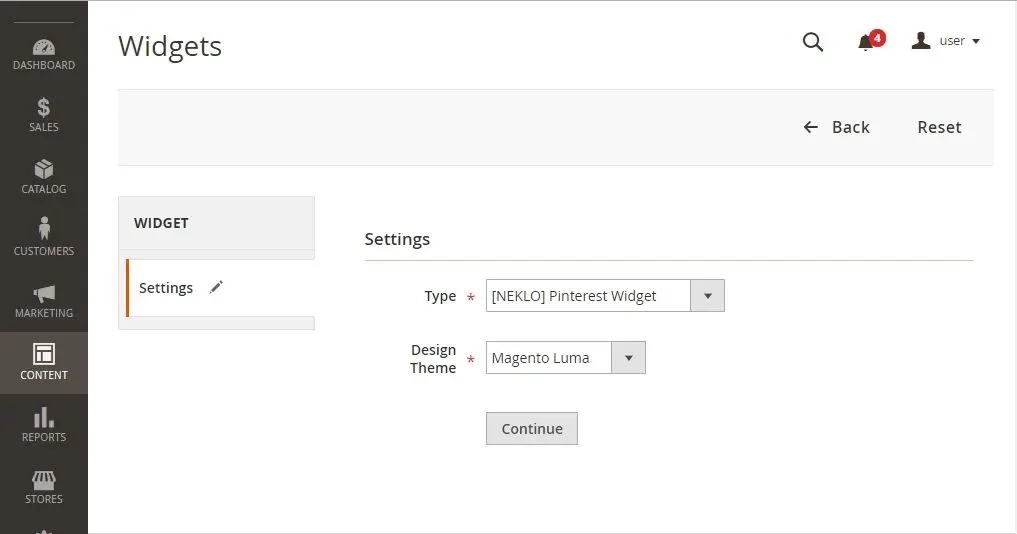
Setting up a new Pinterest Widget
Following Content > Elements > Widgets you can create a Pinterest Widget.
Click on the button “Add Widget” and set the main configurations.
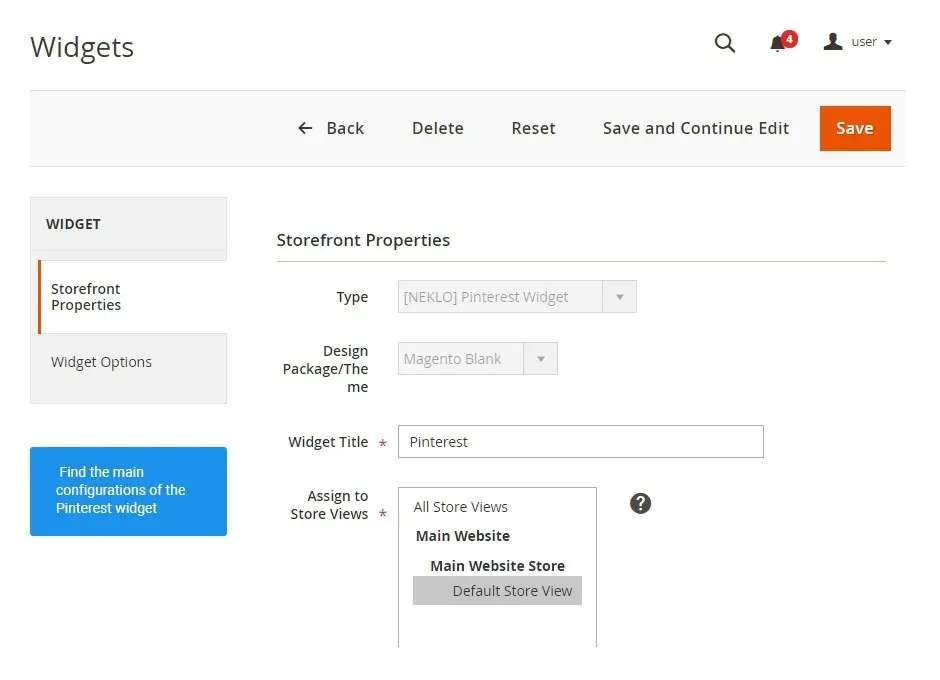
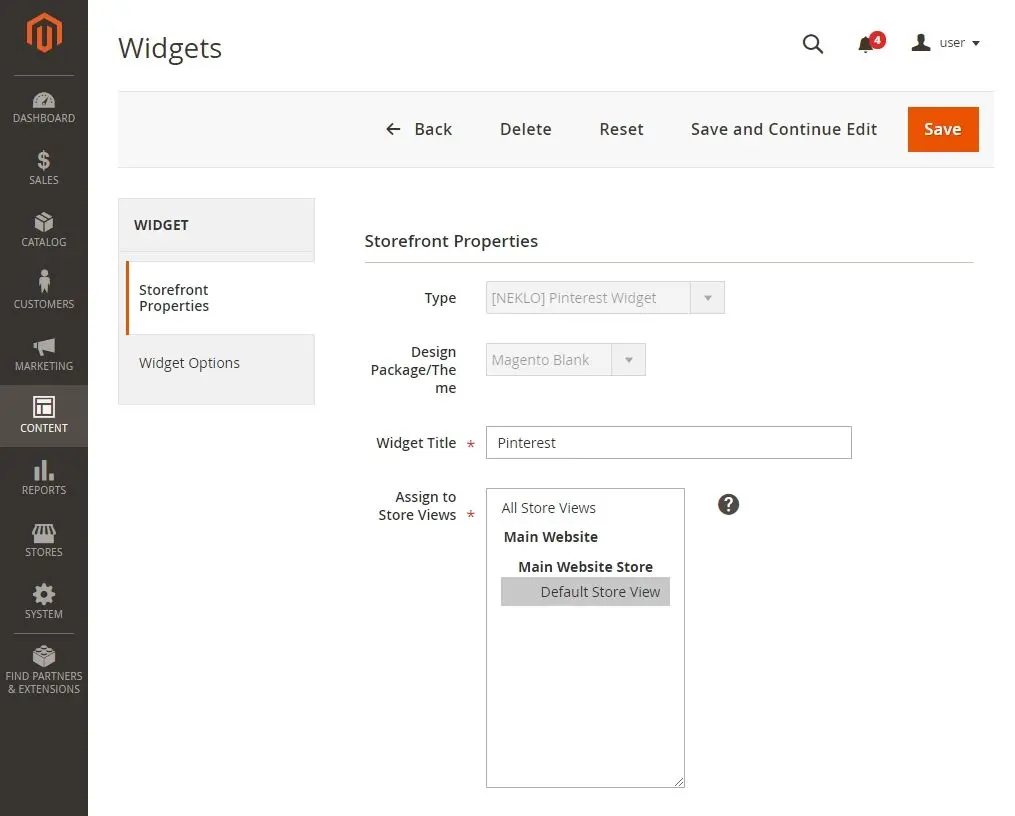
Adjust Storefront Properties
To start the configuration process, go to Content >
Elements > Widgets > The name of your widget > Storefront Properties.
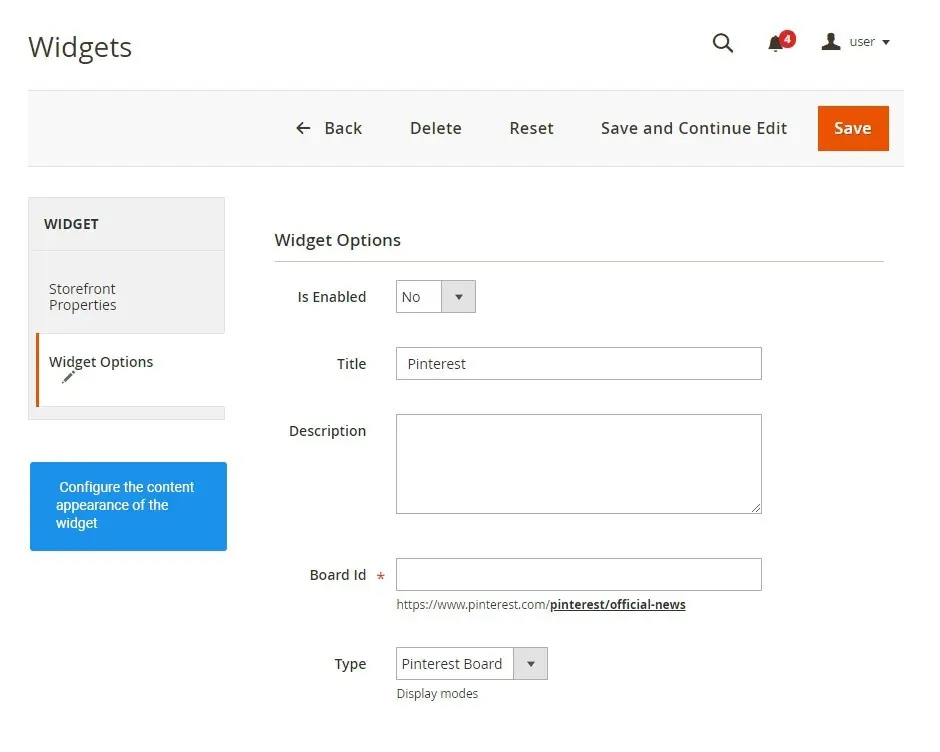
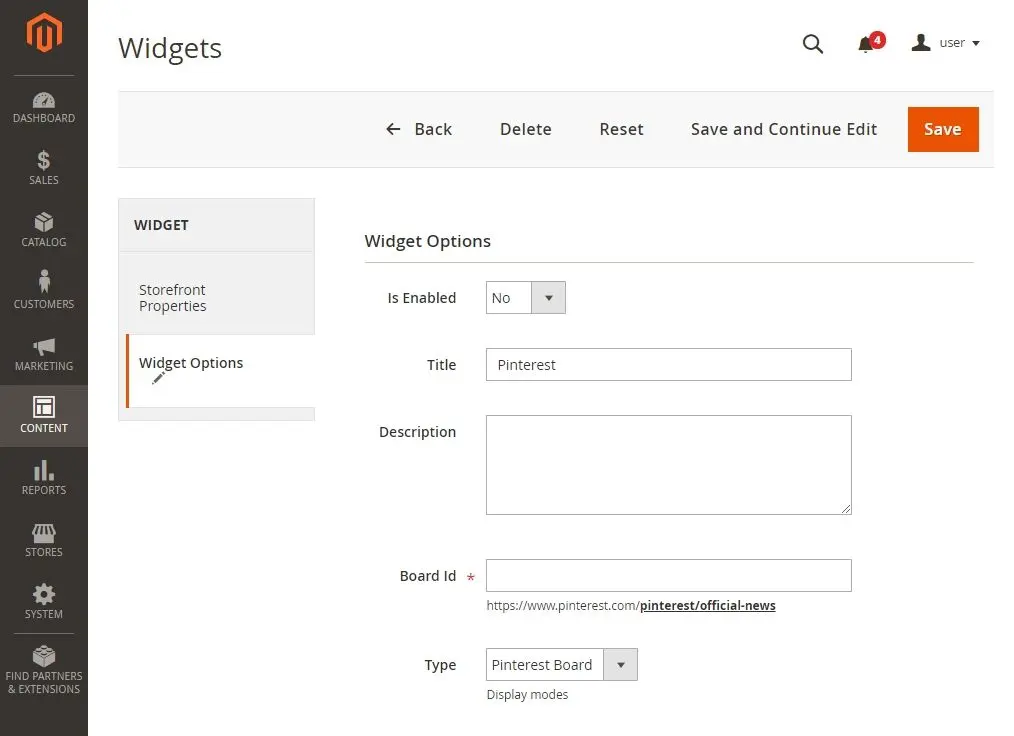
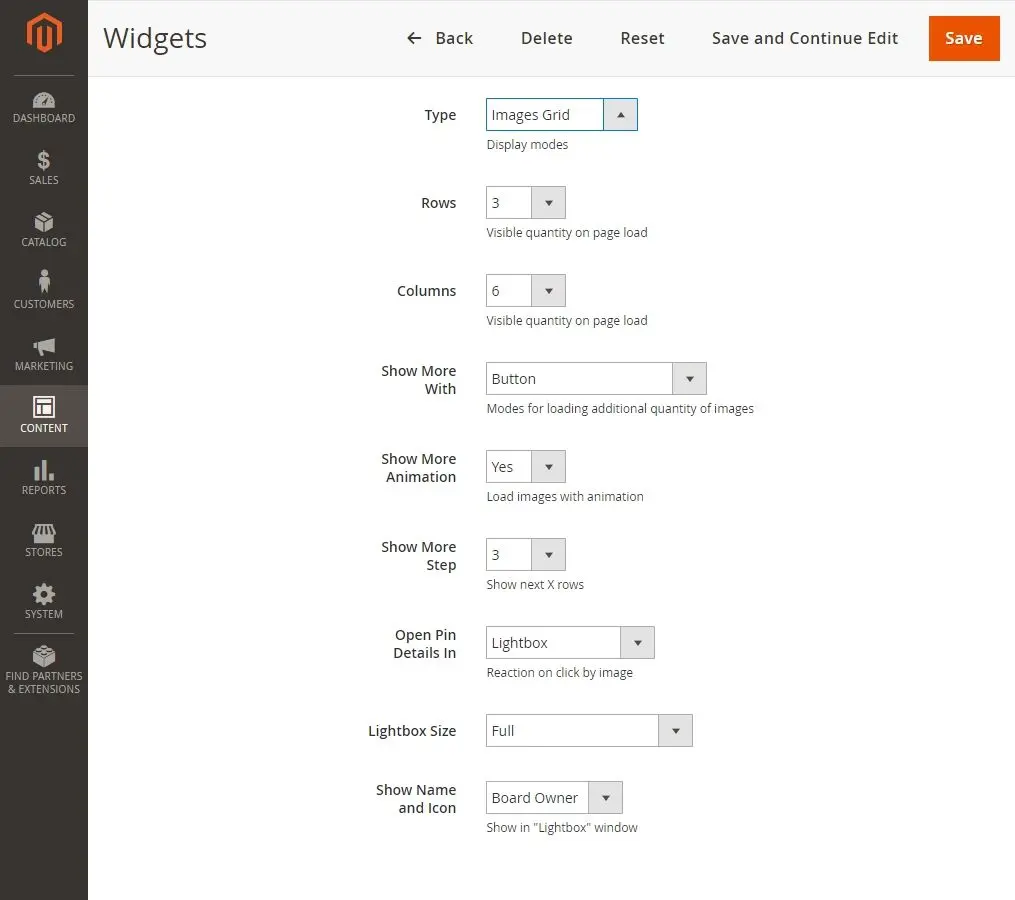
Configure the options
To customize your widget, follow Content
> Elements > Widgets > The name of your widget > Widget Options.
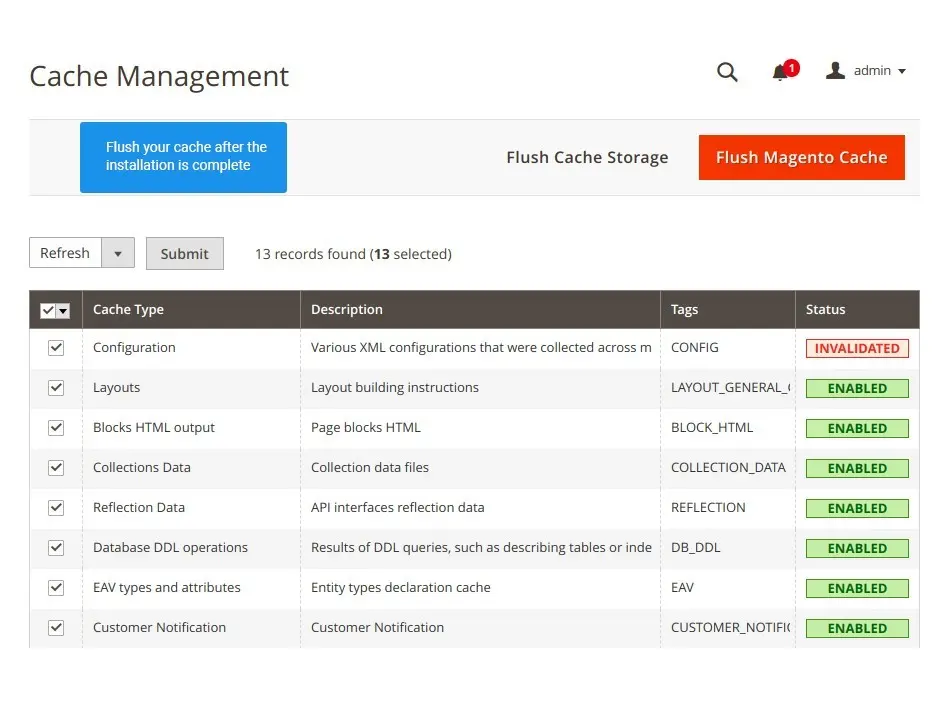
Flush the cache
Don’t forget to clear you cache, when the extension
is installed. You can do that following System > Cache Management.
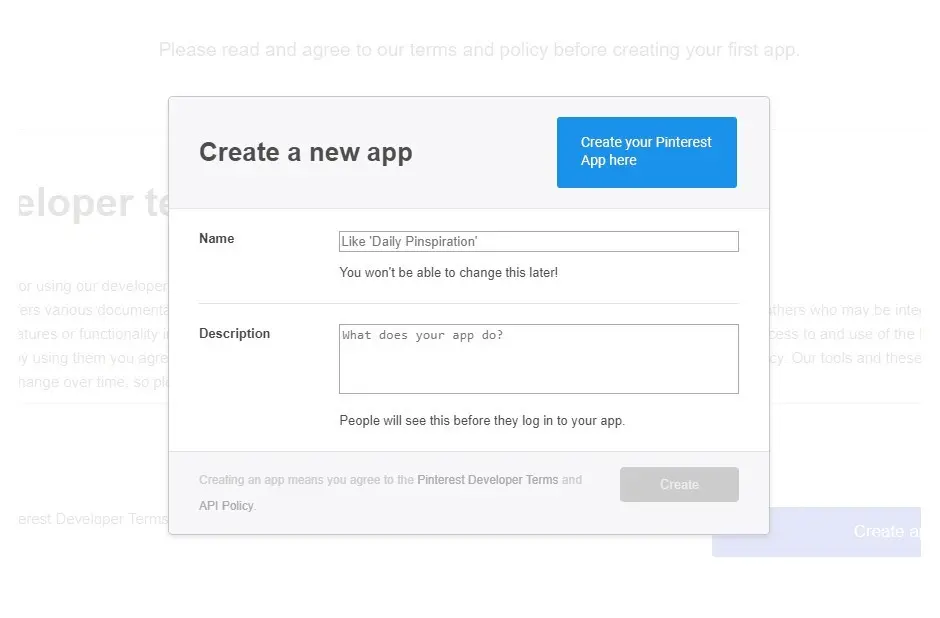
Log in your account on Pinterest and create a necessary app
To start your connection process, create a Pinterest App following this link:
https://developers.pinterest.com/account-setup/

Using Postman for authorization
Use the Postman app to get Access Token.
Follow these instructions to do so:
https://developers.pinterest.com
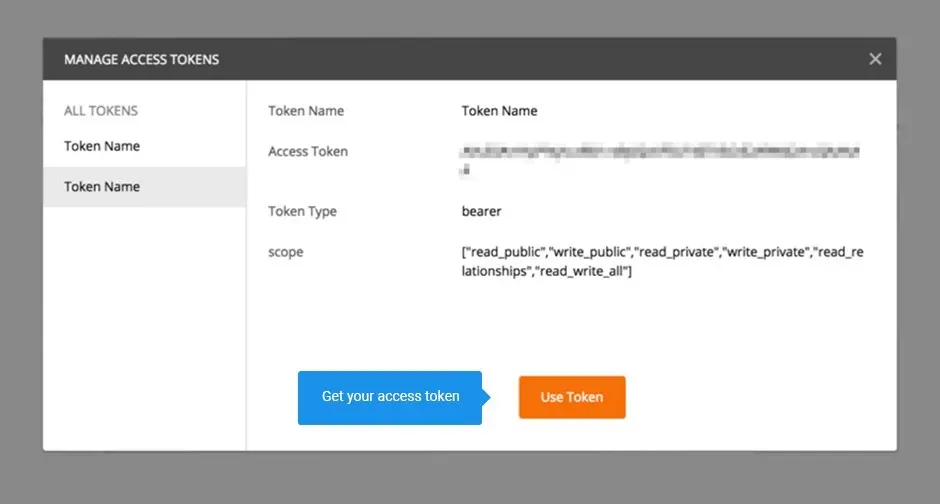
Received Postman’s Token
When using the Postman app, you should receive an access token.
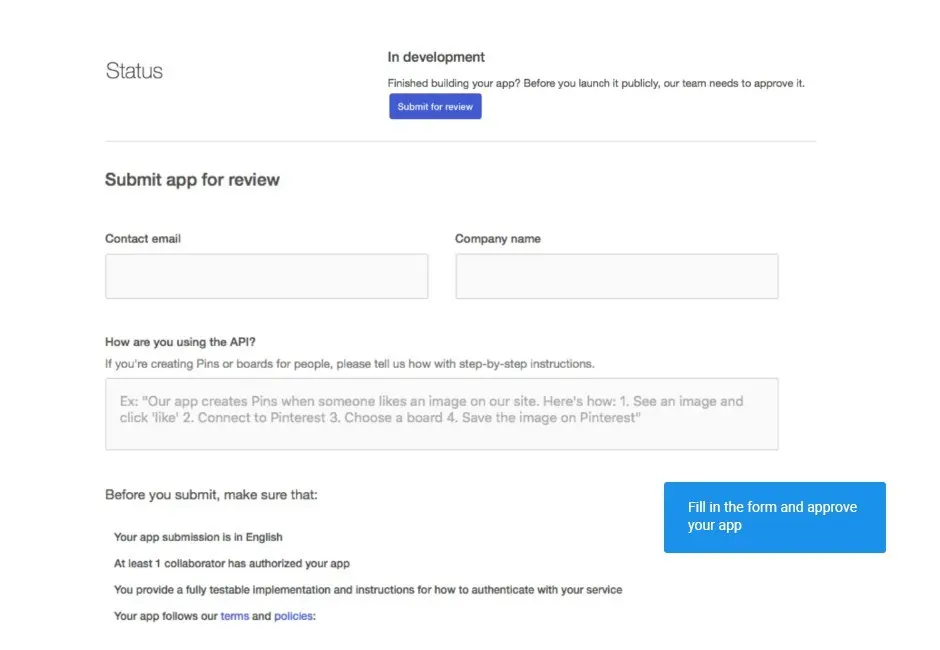
Approve your app
Submit your application for a review
here to receive its full functionality.
General Configurations
Adding a widget
Storefront Properties
Widget Options
Cache Management
Pinterest App
Postman’s Access Token
Generated Token
Application approval
Write Your Own Review
VERSION 1.0.1
17.06.2020
Compatible with CE: 2.1.x - 2.3.x
Compatible with EE: 2.1.x - 2.3.x
Stability: Stable Build
Description:
Compatibility with Magento 2.3.5
Compatible with EE: 2.1.x - 2.3.x
Stability: Stable Build
Description:
Compatibility with Magento 2.3.5
Extension Features
Flexibility of customizations
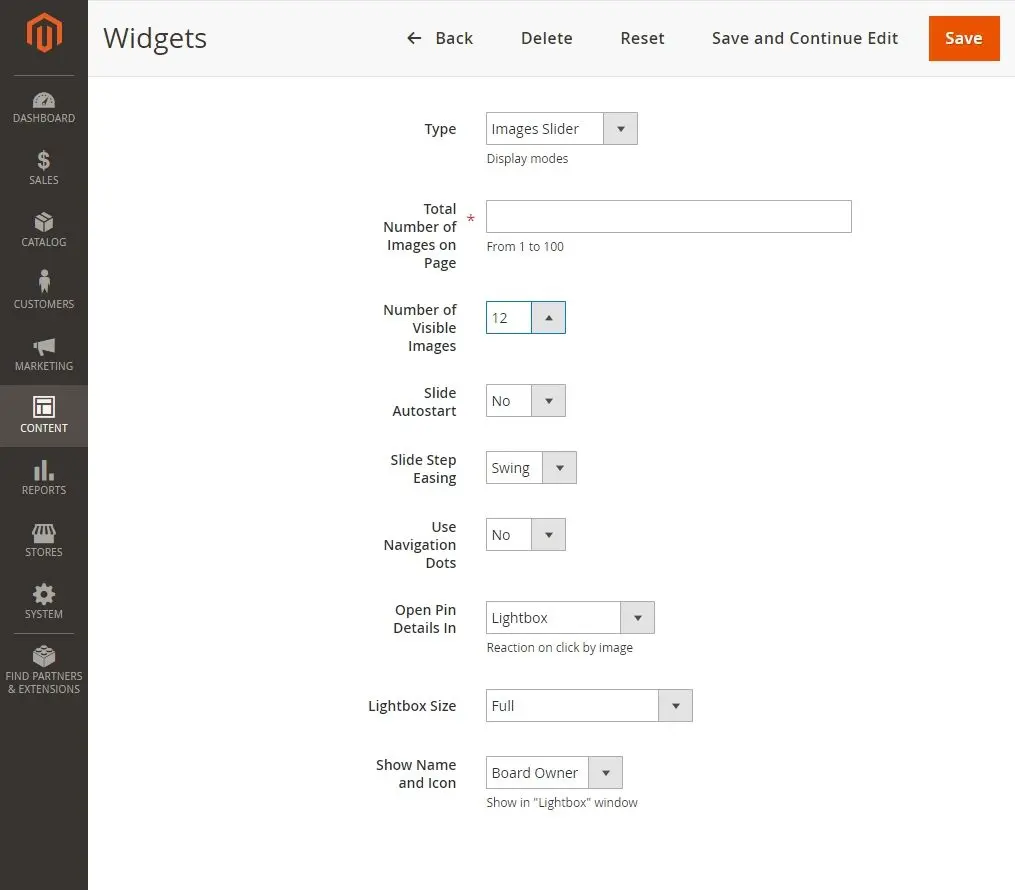
Pinterest Magento 2 custom module allows for selecting
any block and space on your online store’s page to place the widget. With our Magento Pinterest
Widget you can choose from three preset display modes: 1) Pinterest board; 2)Image grid; 3)Image
slider.
Automatic cache removal
This Magento 2 module saves your time usually spent on
manual cache clearing. The key feature of this custom Magento extension is the opportunity to
set cache lifetime, making earlier Pinterest posts go away from the board automatically.
Adjustability to your website’s systems
Pinterest Magento 2 extension by NEKLO can be easily
switched off without actually being disabled. In case you need to test your website or run any
other technical stuff, this feature will be very helpful. When everything is back ready, you
will only need to switch the widget on again.
Connect your Pinterest extension
To start working with the downloaded Pinterest
Extension, you should configure Pinterest API: 1) log in your Pinterest account and create a
Pinterest App https://developers.pinterest.com/account-setup/ 2) generate Access Token. You will
require Postman App for this. The instructions are here:
https://developers.pinterest.com 3) When the token is generated, you will get
restricted access to Pinterest API. To receive full access, submit the app for approval.
Frequently Asked Questions
How to install a Magento extension by NEKLO?
1. Disable Compilation mode if it is enabled (System - Tools - Compilation).
2. Unpack the archive purchased from our Magento Store and copy the contents of the ‘extension’ folder to the root folder of your Magento installation.
3. Log out from Magento Admin panel if you are logged in and then log back.
4. Clear the cache. If Cache Control is enabled in Magento go to ‘System > Cache Management’ section, select ‘Refresh’ under ‘All Cache’ drop-down menu and press ‘Save Cache Settings’.
5. Go to ‘System > Configuration > NEKLO tab > Extensions & Contact’ section and check the list of extensions installed for the name of your purchased extension. If it is in the list the installation is complete.
I’m running several stores, shall I buy a separate extension for each of them or it is possible to use one extension?
You can use one extension per one live Magento installation. It
means that if you run multiple stores on same one Magento installation, you just
buy our extension once and then use it for all your stores.
In case your stores run on separate live Magento installations, you need to buy an extension for each of them.
In case your stores run on separate live Magento installations, you need to buy an extension for each of them.
I’m getting this error: SQLSTATE[23000]: Integrity constraint violation. What shall I do?
Next time, please, disable the compilation
mode prior to uploading the extension files to your server.
And now, please, follow these steps:
1. Open app/etc/local.xml
2. Replace
3. Log in to admin panel and disable the compilation.
4. Revert the changes in the local.xml
5. Clear the cache.
And now, please, follow these steps:
1. Open app/etc/local.xml
2. Replace
3. Log in to admin panel and disable the compilation.
4. Revert the changes in the local.xml
5. Clear the cache.
There’s a "404 Not Found" error when opening configuration page.
Please, log out and then log back into the backend, so Magento can refresh
permissions.
How to uninstall the extension?
To completely uninstall any of our extensions, first start from disabling it. To disable the
extension,
please follow the next steps:
1. Edit … file (where XXX stands for the extension name/code).
2. Change "true" to "false".
3. Clear the cache.
At this point the extension is completely disabled and is not visible for Magento.
Now you can safely remove the extension files, although it is not necessary.
1. Edit … file (where XXX stands for the extension name/code).
2. Change "true" to "false".
3. Clear the cache.
At this point the extension is completely disabled and is not visible for Magento.
Now you can safely remove the extension files, although it is not necessary.
How to disable your extension?
To disable any of our extensions, please, follow this algorithm:
1. Edit app/etc/modules/Neklo_XXX.xml file (where XXX stands for the extension name/code).
2. Change "true" to "false".
3. Clear the cache.
As soon as you have done it the extension is disabled completely, meaning it no longer affects any Magento functionality.
1. Edit app/etc/modules/Neklo_XXX.xml file (where XXX stands for the extension name/code).
2. Change "true" to "false".
3. Clear the cache.
As soon as you have done it the extension is disabled completely, meaning it no longer affects any Magento functionality.
How to translate an extension?
There are two options for translating your Magento extension.
1. Please open app/locale/en_US/ Neklo_XXX.csv, copy it to your locale folder, for example to app/locale/de_DE/ Neklo_XXX.csv and change the wording after the "," so the line will look like "Product review","Testbericht".
2. If there are the necessary language packs installed, you can use inline translation. To do that, please, go to admin/system/configuration/ developer, choose the storeview you want to translate and enable inline translation for it. Then go to the front end, select text and translate.
How to update NEKLO extension?
1. Log in into your account
2. Download the extension (it will be always the latest extension version)
3. Unpack the downloaded folders
4. Disable the Compilation mode in Magento
5. Upload the overwriting existent files of our extensions to Magento root folder (please note that if you customized the files of our extension, the customizations will be overwritten)
6. Refresh site cache (if it\'s enabled)
7. Re-run the Compilation mode
How to install the Pinterest Magento 2 custom module?
To install the Pinterest Magento 2 custom module, you don’t need any special skills. First of all, you should have FTP/SSH access details for proper install-m2ation. Then the process begins:
1
2
3
4
5
6